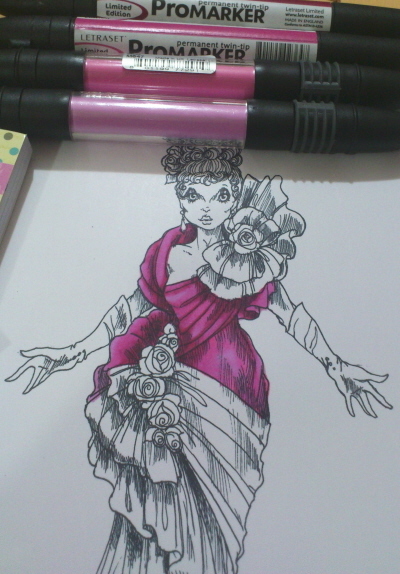
Good day all, today I'd like to share with you a wee tutorial I've created, showing how I colour in folds. I'm using an image by Rick St. Dennis MFA for this tutorial. So many of Rick's beautiful ladies have dresses with lots and lots of folds, and some people find them a little scary to colour. Hopefully this tutorial will show that it's not as difficult as you might think.

For this tutorial I'm using the beautiful Adriana, her dress is perfect for practising your colouring on, and the fact she has roses makes her even more perfect for me.

Step One - Using Wild Cranberry Promarker, I start to colour in the deepest part of the folds on the top of her dress.

Step Two - Using Pink Lobster Promarker, I go over the area i've already coloured and extend the colour further into the folds.

Step Three - Using Cerise Promarker (or equivalent Tria marker) go over the whole area you've already coloured, just leaving some small patches of white space.
Step Four - Using Blossum Promarker ( or equivalent Tria marker) go over the whole area you've already coloured including the patches of white paper. You'll see that not only does this give us our lightest shade of pink on the dress, but it tones down the Cerise, so that the dress doesn't look too bright and garish.


Step Five to Eight - Colour in the next section of the dress, first using the Wild Cranberry, then Pink Lobster, followed by Cerise and finally the Blossum. By working in small sections like this you not only keep your ink wet enough that it blends nicely with each other, but it makes the image easier to tackle.

Step Nine - Looking at all the dress I've coloured so far, I add more Wild Cranberry into the fold where I think it is needed, followed by the other colours, until I'm happy with how it looks as a whole. You don't want it to be obvious which areas you've coloured in at separate times, you want to create a nice flow to your colouring, just like the flow of the fabric.


Step 10 to 14 - Colour in the bottom section of the dress, first using the Wild Cranberry, then Pink Lobster, followed by Cerise and finally the Blossum.


Step 15 to 17 - Colour in the bow on the shoulder, first using the Wild Cranberry, then Pink Lobster, followed by Cerise and finally the Blossum.


Step 18 to 20 - Now it's time to colour in the roses. Start with Petrol Blue Promarker, then Turquoise Promarker, then go over the whole of the roses with Cool Aqua Promarker. At this point using Shale Promarker I worked into the deepest folds making them even darker, until i was happy with the dimension I'd achieved.


Step 21& 22 - Colour in the Skin and Hair, using your favourite combination of colours. For the skin I used Dusky Pink, Blush and Ivory. The hair is coloured with Umber, Walnut and Caramel.

Step 23 - Using a white gel pen I added some highlights to my image. I always like to add some white to the eyes as this makes them sparkle. Adding highlights to the rest of the image is a matter of personal preference, sometimes I do, other times I don't. Either way looks good in my opinion.
Here is Adriana on my finished project;

I hope you've found this tutorial helpful, if you've any questions, just leave them in the comments section, or ask them over at the Rick St.Dennis Facebook Fan Group, and I'll do my best to answer them.
Thank you for taking the time to read this far.
Happy Colouring
Suzi
xxx
Comments