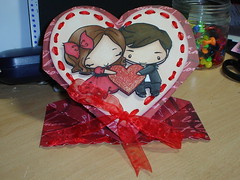
Yesterday was our 5th wedding anniversary, so i thought i'd show you the card i made for Stewart. When i saw this digistamp at The Greeting Farm i knew it would be perfect for our anniversary card, as Ian looks so like Stewart :)
I wanted it to be a special card, so i decided to make a spring card, as Stewart has always liked the previous spring cards i've made, i thought it was time to make him one. I love spring cards, because it's a really easy shape to make, a few scores on my scor-pal and a couple of folds and you have a lovely 3d card.
Once i'd decided on my card shape, i chose my cardstock, i used a 12 x 12 doublesided card i had bought a few years ago (i loved it so much i bought a few sheets, i made our first anniversary card using a sheet of this cardstock lol). I cut it to 12" x 6" then scored at 3", 6", and put a tiny score mark on either edge at 9", i then scored diagonally from the 3" to the 9" marks to create the folds for the spring action. I then folded all the scored lines to create my base card.
Next i printed off 2 copies of the digistamp onto white cardstock, using a scrapbooking template i drew the heart shape around one of the digistamps, and cut this out. I then used this as a guide for cutting the top edge of my spring card. The template also had a border of dots around the edge of the heart so i marked every second dot with a pencil, then used my crop-a-dile to punch out the holes for me to weave the ribon through. I coloured the digistamp on this background piece, so that when the next layer was added any bits you could see of this layer would be coloured and look alot more professional. I then coloured the other digistamp with my promarkers, and added some sakura stardust clear to the hair bow and the heart. I then cut this out ready to layer on the base. Before layering the image i created the ribbon border, simply threading the ribbon through the holes i'd already punched, and then tied it in a nice bow at the bottom. I then layered the image onto this base layer, so that the ribbon border is underneath the main image.
Before putting the card together, i decided to use my threading water punch and create a nice edge along the bottom of the card base, i punch this edge and then threaded somemore ribbon through it to match the ribbon frame, i then secured the ribbon on the base.
Finally i added the heart shaped base to the main card base with some foam pads to give it a bit more dimension, and i glued the bottom of the card so that it would stand up.
I didn't bother with a sentiment, as i figured it looked lovely without it, an the image said everything a sentiment could. I did write on the back a nice personal message to Stewart.
I'm pleased to say he loves the card as much as i do, and has now added it to the display of cards he's creating above the main computer in our living room :)
Thanks for looking
Have a wonderful weekend
Suzi
xxx
Comments